
Take-home copy of our ongoing 3D Adventure game project
Written by Jason Wright for PCYC North
Last updated 2026-03-29
To start with, we'll make some simple shapes to populate our world.
Click the "3D Scene" button in the Scene window to create a new Node3D. Rename it to "World".
Add a child node to our scene. Make it a MeshInstance3D. Rename it to "FloorMesh".
With the FloorMesh selected, look over to the Inspector window.
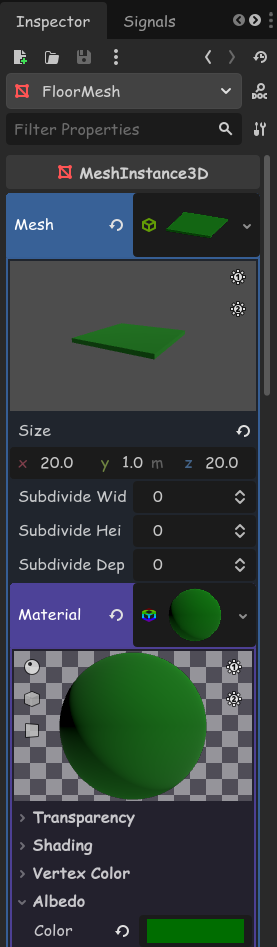
Click on the empty Mesh property and create a new BoxMesh, then click to open the BoxMesh's settings.
Set the Size to be x=20, y=1, z=20
Click on the empty Material property and create a new StandardMaterial3D, then click to open the StandardMaterial3D's settings.
Open the Albedo section and change the Color property to something green.
Add another MeshInstance3D child to the World. Rename it to "Trunk".
Give the Trunk a CylinderMesh, give the mesh a StandardMaterial3D, and give the material a brown Color.
Position the Trunk so it's sticking out the top of the floor.
Add another MeshInstance3D child, this time to the Trunk. Rename it to "Leaves".
Give the Leaves a CylinderMesh, and set its Top Radius to 0 and Bottom Radius to 1
Give the mesh a StandardMaterial3D, and give the material a greenColor (different to the floor!).
Position the Leaves so it's sitting on top of the Trunk.
Add a Camera3D child to the World, and position it so it can see everything.
At this point we can play our game and see that everything is dark!
In the editor view we can see OK because of the placeholder environment and light.

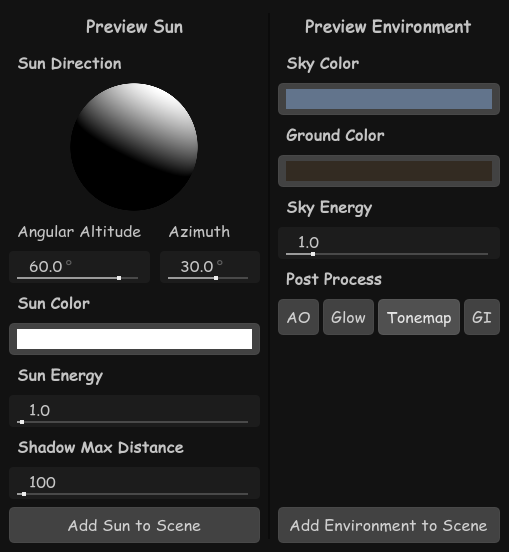
In the 3D view, we can see sun and environment buttons, and toggle them on and off.
If we click on the three-dots menu button next to them, we can also add them to our world.
Click "Add Sun to Scene" and "Add Environment to Scene" to create DirectionalLight3D and WorldEnvironment nodes.

First, delete the Camera3D we just made in the World.
Create a new Scene, and make it a Node3D. Name this new node "Player".
Add a Camera3D child to the Player. Move the camera up to about y=1.5

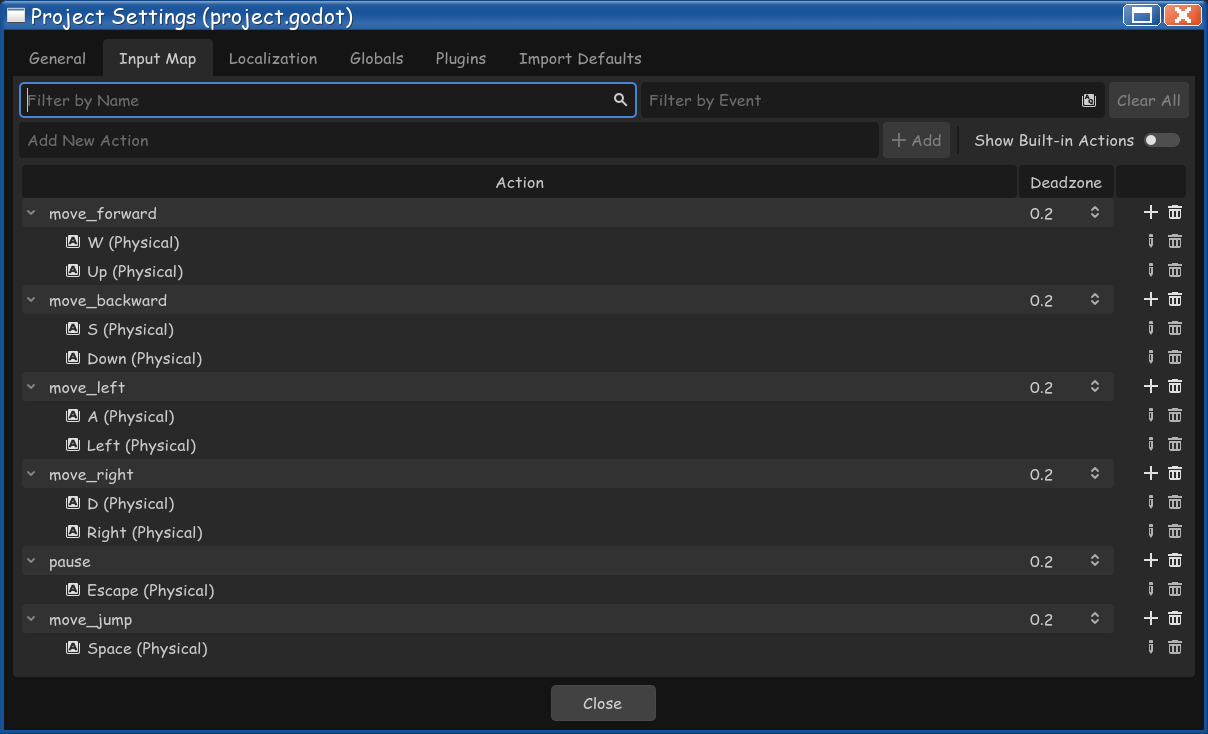
To be able to easily move the camera with the mouse, we need to "capture" the mouse.
Go into the Input Map settings, create an action called "pause", and assign the Escape key to it.
Now we need to write some code to move the camera when we move the mouse. Add a script to the Player node.
#player.gd

extends Node3D

func _ready():
	# capture mouse at game start
	Input.mouse_mode = Input.MOUSE_MODE_CAPTURED

func _input(event):
	if event.is_action_pressed("pause"):
		# toggle mouse capture when pressing pause
		if Input.mouse_mode == Input.MOUSE_MODE_CAPTURED:
			Input.mouse_mode = Input.MOUSE_MODE_VISIBLE
		else:
			Input.mouse_mode = Input.MOUSE_MODE_CAPTURED

	if event is InputEventMouseMotion:
		# get movement relative to last position
		var motion = event.screen_relative

		# set camera sensitivity
		motion = motion * 0.1

		# rotate camera up and down
		$Camera3D.rotate_x(deg_to_rad(-motion.y))

		# rotate player left and right
		rotate_y(deg_to_rad(-motion.x))

		# prevent looking further up or down than 90 degrees
		$Camera3D.rotation.x = clamp(
			$Camera3D.rotation.x,
			deg_to_rad(-90),
			deg_to_rad(90) )
Note that we need to use deg_to_rad() to convert angles in degrees, into angles in radians. Godot thinks in radians.
We're going to use Godot's physics system to move around, so we need to change what kind of node the Player is.
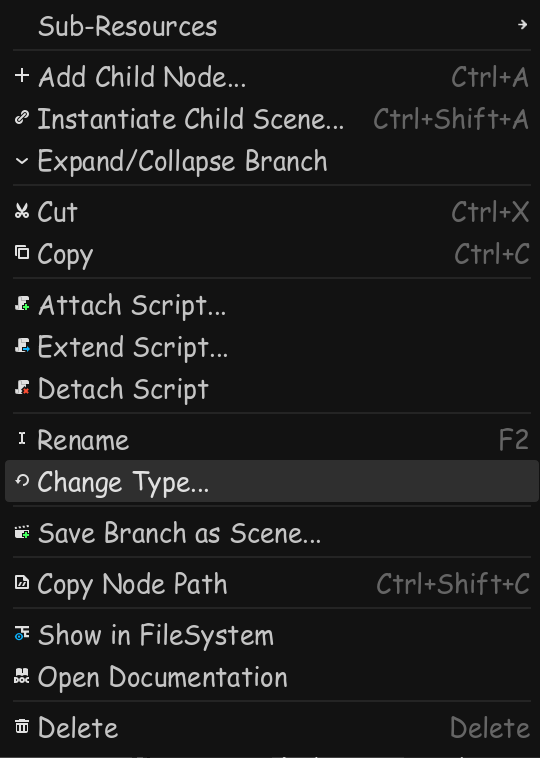
Right-click on the Player node and select "Change Type...", and change it to a CharacterBody3D.
We need some more controls - move_forward, move_backward, move_left and move_right assigned to WASD or arrow keys.
#player.gd

# we need to change the "extends" line to match the new node type
extends CharacterBody3D

...

func _physics_process(delta):
	# find out which direction we're pressing
	var direction = Input.get_vector( "move_left", "move_right",
		"move_forward", "move_backward" )

	# rotate to match the Player's facing
	var motion = transform.basis * Vector3(direction.x, 0, direction.y)

	# multiply by movement speed (8 metres per second)
	velocity.x = motion.x * 8
	velocity.z = motion.z * 8

	# tell the physics system to move us
move_and_slide()Everything in our world that we want to be solid needs to consist of a physics body node with a child collision shape node. We need to rearrange things a little bit.
Add a CollisionShape3D child to the Player and give it a CapsuleShape. Move the collision shape up to y=1 so the bottom of the capsule matches the CharacterBody3D's position.
In the world scene, create a new StaticBody3D node for the ground, and rename it to "Floor". Click and drag the existing FloorMesh to make it a child of the new Floor.
MeshInstance3D node is selected.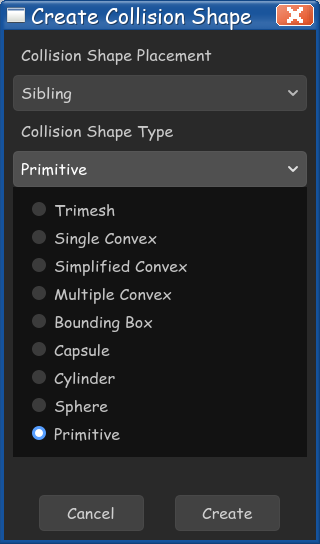
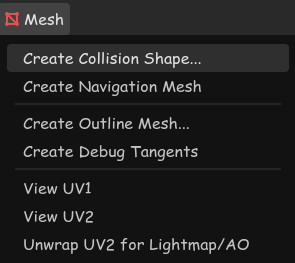
With the FloorMesh selected, in the 3D view there is a "Mesh" menu. Open the menu and click on "Create Collision Shape".
We want our collision shape to be a "sibling" of the mesh (also a child of the StaticBody3D).
Since our FloorMesh is a primitive shape (a box), we can select the "Primitive" collision shape type to generate a BoxShape3D
.Click "Create" and Godot will generate a CollisionShape3D node with a BoxShape3D the same size and shape as the FloorMesh.
While we're making changes to the Tree, let's make it its own scene. This way any changes we make later on will be reflected across all "instances" of the Tree.
Create a new scene and make it a StaticBody3D node. Rename it to "Tree".
Copy the Trunk node from the World scene, and paste it into the Tree scene. Make sure the trunk's position is x=0,y=1,z=0
Follow the same steps as above to make a collision shape for the trunk. Select the trunk, open the Mesh menu, select "Create Collision Shape", and make a primitive sibling shape (in this case a cylinder).
Making a collision shape for the leaves is slightly different. A CylinderMesh can be pointy on the top but a CylinderShape3D can't! In the "Create Collision Shape" menu, select the "Trimesh" type.
The new leaves collision shape will be a child of the trunk mesh, but it needs to be a child of the StaticBody3D, so click and drag to move it up.
Now that the ground is solid, we can add gravity to the player.
While we're here we'll add jumping to the game. Create a new "jump" action and assign it the spacebar.
#player.gd

...
var gravity = 30 # metres per second per second
var jump_height = 2 # metres
...

func _physics_process(delta):
	# only fall if we're not on the ground
	if not is_on_floor():
		velocity.y -= gravity * delta
	else:
		# only jump if we are on the ground!
		if Input.is_action_just_pressed("move_jump"):
			# magic jump force formula
			velocity.y = sqrt(jump_height * gravity * 2)

...Let's make the player respawn if we fall off the world, instead of falling forever.
We need to know where the player started. And then we'll check if we're below a certain height, and respawn if we are.
#player.gd

...

# @onready is similar to writing code in the _ready() function
# the code runs when the player starts existing - at the start of the game
@onready var start_position = position

...

func _physics_process(delta):
	# if we are less than -10 metres high...
	if position.y < -10:
		# move back to our saved position
		position = start_position
		# stop moving
		velocity = Vector3(0,0,0)

...Adding the ability to double jump means shuffing around our existing jumping code a bit.
I've ended up checking if we're on the floor three times - maybe you can come up with a tidier way of writing the logic?
#player.gd

...

var can_double_jump = true

...

func _physics_process(delta):
	...

	# only fall if we're not on the ground
	if not is_on_floor():
		velocity.y -= gravity * delta
	else:
		# reset ability to double jump if we're on the floor
		can_double_jump = true

	# don't necessarily have to be on the floor to jump
	if is_on_floor() or can_double_jump:
		if Input.is_action_just_pressed("move_jump"):
			# disable double jumping if we jumped in the air
			if not is_on_floor():
				can_double_jump = false
			# magic jump force formula
			velocity.y = sqrt(jump_height * gravity * 2)

...We'll use a raycast to detect things we can click on. Think of it like a laser pointer stuck to our nose. Add a child node to the player's camera, a RayCast3D.
A raycast has a Target Position. Set the position to x=0,y=0,z=-3 so it points forwards.
Next, create an action called "interact" in the Input Map, and assign it the left mouse button.
We'll do something called "duck-typing" to tell if we're looking at something we can click on. "If it walks like a duck, and talks like a duck..."
What this means is, we'll check if what we're looking at has a certain function, which we'll call interact_with_me.
#player.gd

...

func _input(event):
	if event.is_action_pressed("interact"):
		# find out if we're looking at something
		var collider = $Camera3D/RayCast3D.get_collider()
		if collider:
			# run the "interact_with_me" function if it's there
			if collider.has_method("interact_with_me"):
				collider.interact_with_me()

...
Now we need to make something to interact with! Let's make a cube that changes colour.
Create a new scene and make the root node a StaticBody3D, and name it "ColourCube". Add a CollisionShape3D child with a BoxShape3D, and a MeshInstance3D child with a BoxMesh. Give the BoxMesh a StandardMaterial3D.
Finally, we'll add a script to our ColourCube.
#colourcube.gd

extends StaticBody3D

func interact_with_me():
	# generate a new colour with random floats
	new_colour = Color( randf(), randf(), randf() )

	# change the colour of the material
	$MeshInstance3D.mesh.material.albedo_color = new_colour
Add a ColourCube to our world, and we should be able to see it in action.